How to Calibrate a Digital Protractor for Carpentry
If you’re a carpenter, woodworker, or DIY enthusiast, you know that precision is everything when it comes to getting the job done right. One small error in an angle can lead to big problems later on, whether you’re framing walls, cutting joints, or assembling furniture. That’s where a digital protractor comes into play—it helps you measure and set angles with pinpoint accuracy. But even the most advanced tools need regular calibration to ensure they’re working at their best. If your protractor isn’t calibrated correctly, you could end up with measurements that are off, and that can result in costly mistakes.
Now, let me guess: the thought of calibrating your digital protractor might sound a bit intimidating, right? I get it—tools and their settings can feel a little complicated sometimes. But trust me, it’s not as hard as it sounds. In fact, once you understand the basics, it’s a pretty straightforward process. The best part? Proper calibration will make your carpentry projects so much easier, saving you time and hassle in the long run.
Here’s the deal: calibrating your digital protractor is a simple way to make sure that your angles are as accurate as possible. If you’ve noticed that your digital protractor’s readings don’t seem right, it might be time to calibrate it. Don’t worry—I’ll walk you through the entire process, step by step, so you can get back to your carpentry work with the confidence that your tool is giving you precise readings.
So, why does calibration matter so much? Well, think about this: when you’re working on a fine piece of carpentry, like a picture frame or a cabinet, even a tiny miscalculation in an angle can throw off the entire structure. Without accurate readings, things won’t fit together properly. And that’s not a mistake you want to make after spending hours on a project. But don’t worry, by the end of this article, you’ll know exactly how to calibrate your digital protractor—and how to maintain it so that it stays accurate throughout all your projects.
Ready to dive in and make sure your protractor is working its best? Let’s get started!
What is a Digital Protractor?
Before diving into the calibration process, let’s take a moment to understand exactly what a digital protractor is and how it’s different from other tools you might use in carpentry.
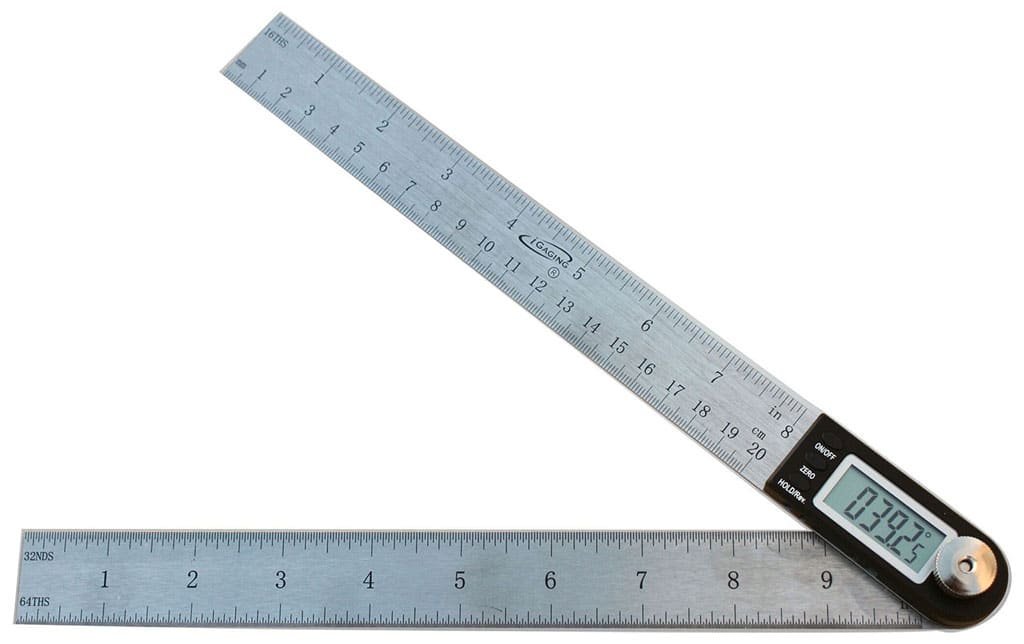
At its core, a digital protractor is a modern, high-tech tool designed to measure angles with a digital display, which makes reading the angle more straightforward and precise than with traditional, mechanical protractors or angle finders. It typically has a flat, adjustable arm or blade that you can place against surfaces to measure the angle between them. The angle is displayed on an easy-to-read digital screen, eliminating the guesswork and increasing your overall efficiency when working on any carpentry project.
How a Digital Protractor Works
A digital protractor relies on an electronic sensor inside the device that measures the angle between two surfaces. When the protractor is placed against the workpiece, the sensor detects the tilt and then transmits that information to a small LCD screen, which displays the angle in real-time. Some models even allow you to store measurements, perform calculations, and switch between degrees, radians, or slopes, giving you flexibility on various carpentry tasks.
In short, it’s an upgraded version of a traditional protractor that makes angle measurements faster, more accurate, and more user-friendly. Imagine trying to measure the angle of a complex cut on a miter saw using a regular protractor—it can be tricky, right? With a digital protractor, you simply place the tool, read the number, and you’re good to go. Easy!
Advantages of Using a Digital Protractor in Carpentry
Now, you might be wondering, Why should I use a digital protractor instead of a traditional one? Good question!
Here are a few key benefits:
- Enhanced Accuracy: Unlike mechanical protractors that can wear down or be difficult to read, digital protractors are far more accurate and give you precise angle measurements down to decimal points.
- Quick Readings: With a digital display, you don’t need to squint at tiny degree markings. You’ll get instant and clear readings, which makes it easier to work faster and with more confidence.
- Ease of Use: Digital protractors often feature user-friendly buttons and features, such as zeroing out the device or flipping the reading upside down. This makes them especially great for projects where space is tight, or you’re working at odd angles.
- Versatility: You can use digital protractors for a wide range of carpentry applications, from cutting joints to installing trim to measuring angles in framing. Some models even come with built-in levels, making them doubly useful for carpenters and woodworkers alike.
With all of these advantages, it’s no surprise that digital protractors have become a staple in the toolkits of professionals and DIYers. The problem is, like all tools, they can lose their calibration over time, leading to inaccurate readings. That’s where proper calibration comes in.
Why Calibrate a Digital Protractor?
Okay, so we’ve established that a digital protractor is a useful tool, but why should you bother calibrating it? Well, just like a car needs regular maintenance to run smoothly, your tools—especially ones that rely on electronic sensors—need calibration to keep performing at their best.
The Need for Precision in Carpentry
In carpentry, precision isn’t just a nice-to-have—it’s a must. Whether you’re cutting the perfect 45-degree angle for a miter joint or measuring the exact slope for roof framing, even a small error can have a big impact on the final product. That tiny miscalculation could lead to pieces not fitting together, wasting material, or worse, ruining an entire project.
This is where a calibrated digital protractor really shines. When your tool is properly calibrated, you can trust the measurements it provides. Your cuts will be accurate, your angles perfect, and your projects will come together just as you envision them.
How Calibration Ensures Accuracy
Calibration ensures that the digital protractor is providing you with the correct readings. As the tool gets used over time, it’s possible that the internal sensors or the mechanical parts (like the internal leveling components) may shift, leading to slight inaccuracies. Regular calibration ensures that these parts are set correctly so that the readings remain precise, no matter how much you use the tool.
Consequences of an Uncalibrated Protractor
If you skip out on calibrating your digital protractor, you may find yourself facing a whole bunch of issues, including:
- Incorrect Measurements: The most obvious problem is that your angles will be off, leading to poor-fitting joints, imprecise cuts, or poorly aligned parts.
- Time Wasted: Instead of working efficiently, you’ll end up double-checking your measurements, making extra cuts, and ultimately losing valuable time.
- Potential Damage: In some cases, incorrectly measured cuts could lead to more significant issues, such as structural problems or wasted materials.
By calibrating your tool, you can avoid these frustrations and work with confidence, knowing that your digital protractor is always giving you reliable readings.
Tools You’ll Need to Calibrate Your Digital Protractor
Before you jump into the calibration process, it’s essential to have the right tools on hand.
Here’s a quick checklist of everything you’ll need:
- A Calibration Block (or Reference Surface):
This is an essential part of the process. A calibration block is usually a flat surface that has a known, accurate angle (often 0° or 90°). You can also use a known, level surface if you don’t have a specific block. - Screwdriver (for models that require adjustment):
Some digital protractors allow you to manually adjust the internal settings to fine-tune the calibration. A small screwdriver is usually all you’ll need for this. - A Leveling Tool:
If you’re not using a calibration block, you may want to use a separate leveling tool to ensure that your protractor is aligned properly with the reference surface. - Clean Cloth and Alcohol Wipes:
Cleanliness is crucial during calibration. Dust, dirt, or grease on the sensor or display could interfere with accurate readings. Wipe everything down before you begin.
Step-by-Step Guide to Calibrating Your Digital Protractor
Alright, now that you’ve got your tools ready, let’s dive into the step-by-step process of calibrating your digital protractor. Don’t worry—I’ll break it down for you and make sure each step is as easy to follow as possible.
Understand Your Digital Protractor’s Display and Settings
Before you begin, take a moment to familiarize yourself with the display and buttons on your protractor.
Every model is a bit different, but most digital protractors will have:
- Power button
- Reset button (if applicable)
- Display unit switch (degrees, radians, or slope)
- Zeroing function (to set the tool to zero for a clean start)
Make sure you understand what each button does so you’re not fumbling around in the middle of calibration.
Prepare Your Workspace
For a successful calibration, you’ll need a flat, level surface. This ensures that your digital protractor will be aligned correctly during the process. If you’re using a calibration block, place it on your workbench. If you don’t have one, a known flat and level surface will work just fine.
Reset Your Digital Protractor
Many digital protractors allow you to reset the internal components to their factory settings. If your protractor has this feature, press the reset button before proceeding. This ensures that you start the calibration process from scratch, without any prior discrepancies.
Align the Protractor to a Known Angle
Place your protractor on the reference surface. The goal here is to align the tool to a known, accurate angle—typically 0° (horizontal) or 90° (vertical). If you’re using a calibration block, make sure it’s positioned correctly, and the tool is reading it at its exact angle.
Adjust the Calibration
At this point, your protractor may show a reading that’s slightly off. Use the adjustment screws (if applicable) to fine-tune the reading. Slowly adjust the internal calibration until the protractor reads the exact angle of the surface you’re aligning it to.
Double-Check the Calibration
Once you’ve made the adjustment, it’s a good idea to check the calibration by measuring a few other known angles (such as 45° or 30°). This ensures that your protractor isn’t just accurate at one point but across multiple angles.
Test Your Protractor
To confirm that the calibration is spot-on, test the protractor on a real carpentry project. Measure the angles of a sample cut or joint. If everything lines up perfectly, congratulations! You’ve successfully calibrated your digital protractor.
Mastering Precision in Carpentry with a Calibrated Digital Protractor
Now that you’ve learned how to calibrate your digital protractor, you’re ready to take your carpentry skills to the next level. It’s easy to overlook something as seemingly small as calibration, but it can make a world of difference in your work. A properly calibrated protractor ensures that every angle is spot-on, whether you’re framing a wall, cutting joints, or crafting intricate furniture pieces.
Think about it—every angle, every cut, every joint in your project now has the backing of a perfectly aligned tool. That means fewer mistakes, less wasted material, and a whole lot more satisfaction when you step back and admire your finished work. No more second-guessing whether that angle is really right. Instead, you’ll have the peace of mind that comes with knowing that each measurement is accurate.
And the best part? Once you get the hang of it, calibrating your digital protractor will become second nature. It’s a skill you’ll keep for life, and it’ll always give you that extra edge in your carpentry projects.
It’s not just about fixing a tool—it’s about creating an environment where precision becomes your habit. When you rely on a calibrated digital protractor, you’re ensuring your craftsmanship stays sharp, and your projects continue to come together exactly as you’ve envisioned. Whether you’re a professional carpenter or a passionate DIYer, the ability to calibrate your tools with confidence is a game-changer.
So go ahead—pick up that protractor, take a moment to calibrate it, and get back to doing what you love. Because with every accurate angle you measure, you’re not just building with wood; you’re building trust in your skills, your tools, and your ability to make your vision come to life, one perfectly measured cut at a time.
Happy carpentry, and remember: when your tools are calibrated, your projects are guaranteed to shine!
Final Thoughts: The Art of Precision – Why Calibration is Key to Exceptional Carpentry
As you wrap up your journey to mastering the art of calibrating a digital protractor, it’s important to take a moment and reflect on how this skill directly impacts your craft. Carpentry is not just about cutting, measuring, and assembling—it’s about creating something lasting. Whether you’re crafting a custom-built bookshelf, framing a home, or making detailed moldings, precision is the foundation of everything you do. Without it, your work risks falling short of the standard you’re striving for. That’s why ensuring your tools are calibrated and functioning properly is crucial—not only for the final results but also for the joy and confidence that comes with working with accuracy.
Think about it: calibration isn’t a one-off task; it’s a way to embrace a mindset of quality and professionalism. Every time you calibrate your digital protractor, you’re committing to getting it right the first time. The satisfaction you’ll feel when all your angles are perfectly aligned, and your cuts fit seamlessly together is worth every minute spent in calibration. It’s like tuning an instrument before playing a piece of music—your work becomes an expression of skill, precision, and care.
How Calibration Elevates Your Craft
The digital protractor, while a small tool in your toolbox, holds the power to elevate the quality of your entire project. Calibration ensures that every measurement you take aligns perfectly with your design, making your carpentry work more efficient and more accurate. Not only will this reduce material waste, but it’ll also save you time and frustration. Instead of backtracking to fix mistakes, you’ll keep your workflow smooth and continuous.
And don’t forget about the cost savings—having a well-calibrated tool means you won’t be throwing away precious wood, losing materials to incorrect cuts, or needing to buy extra pieces because your angles weren’t right. Over time, the savings add up, making your investment in a quality digital protractor even more worthwhile.
The Confidence That Comes with Precision
There’s something incredibly empowering about knowing you have the right tools and the right skills to get the job done. Calibration doesn’t just give you accurate readings—it gives you confidence in your abilities. With every angle measured and every cut made with precision, you’ll see a clear improvement in your craftsmanship. That sense of mastery will be reflected in your finished projects. So, whether you’re a seasoned carpenter or a weekend DIY enthusiast, calibrating your digital protractor should become second nature.
You’re not just relying on technology; you’re investing in yourself and your craft. Calibration is your assurance that your tools are performing at their peak, helping you achieve the flawless results you aim for.
Keeping It Consistent: A Habit to Cultivate
The real secret to maintaining accuracy in carpentry is consistency. Just like you wouldn’t skip a coat of finish on a beautifully crafted table, you shouldn’t skip out on calibrating your tools. By regularly calibrating your digital protractor—whether it’s after a few projects or if you notice inconsistencies in your measurements—you’ll ensure that your tool remains in top shape.
This consistent practice doesn’t just keep your protractor calibrated; it helps to ingrain precision into your workflow. Calibration becomes more than just a task—it’s part of the ritual that turns good carpentry into great carpentry.
Moving Forward: Keep Building, Keep Learning
Calibration is a key part of your woodworking toolkit, but it’s not the only one. It’s a tool in your arsenal that allows you to continue learning, improving, and pushing the boundaries of your craftsmanship. As you progress in your carpentry journey, you’ll start noticing other areas where precision matters—from the setup of your miter saw to the alignment of your joints. Calibration, in this sense, teaches you to approach your work holistically: it’s not just about the angles you measure but also the tools and techniques you use throughout the entire project.
As you apply what you’ve learned about calibrating your digital protractor, don’t be afraid to experiment, make mistakes, and grow from them. The more you work with your tools, the more intuitive it will become. And remember, each time you calibrate your protractor and make that perfect cut, you’re not just building something out of wood—you’re building your confidence and honing your skills.
Please read more about the best digital protractor.
FAQs
Can I use a digital protractor for all types of carpentry projects?
Yes, digital protractors are versatile and can be used for a wide range of carpentry tasks, including framing, trim work, and even angled cuts on power saws.
How often should I calibrate my digital protractor?
It’s a good idea to calibrate your protractor every few months or whenever you notice inaccuracies in your readings. Frequent use in rough environments might require more regular calibration.
What’s the difference between a digital protractor and a traditional angle finder?
While traditional angle finders use manual readings and rely on physical scales, digital protractors offer digital readings that are more precise and easier to interpret, saving you time and frustration.
Can I calibrate a digital protractor without a calibration block?
Yes, as long as you have a flat and level surface that is known to have an accurate angle, you can calibrate the protractor without a block. A carpenter’s level will help a lot in this case.
How do I know if my protractor is properly calibrated after testing?
The best way is to test your protractor by measuring several known angles (such as 45° or 90°). If the readings are accurate each time, your protractor is properly calibrated.
Final Thoughts on the FAQs: Empowering Your Carpentry Journey with Precision
By now, you should have a solid understanding of how to calibrate a digital protractor and why it’s so important for achieving precision in carpentry. But sometimes, questions linger, and that’s perfectly okay! The FAQs section is designed to help you dig deeper into the process and address any lingering doubts. These questions highlight common concerns and provide further clarity, empowering you to confidently apply your new calibration skills.
As we’ve discussed, precision is the foundation of exceptional carpentry work. A properly calibrated digital protractor ensures that your measurements are accurate and consistent, which saves you time, material, and energy. With every project, whether it’s framing a house or crafting intricate woodworking details, you’ll feel more confident knowing that your tool is calibrated to give you reliable readings.
Reinforcing the Importance of Calibration in Carpentry
These FAQs also highlight the recurring theme: calibration is essential for quality work. Whether you’re just starting out in carpentry or you’ve been working on projects for years, keeping your tools in top condition—especially something as critical as your protractor—will directly impact the outcome of your work. Skipping this step may seem like a minor issue, but over time, small errors add up, affecting the accuracy of your cuts and joints.
What’s clear from the FAQs is that calibration isn’t just a one-time task, but rather something that should be part of your regular maintenance routine. If you ever feel unsure about your readings, testing the tool against known angles, as recommended, is a quick and easy way to ensure your protractor is functioning properly.
Confidence and Consistency: The Cornerstones of Success
Another important takeaway from the FAQs is the confidence that comes with knowing your tools are calibrated correctly. It’s one thing to have the best tools, but it’s another to know how to use them effectively. By mastering the calibration process, you’re not only learning how to take accurate measurements but also building confidence in your ability to execute every project with precision. Over time, this confidence will become second nature, and you’ll approach each task with a deeper sense of mastery and self-assurance.
Calibration as a Habit, Not a Hassle
If there’s one key piece of advice from the FAQs that stands out, it’s this: calibration should be a regular habit, not a tedious chore. While it may seem like an extra step at first, once you get into the rhythm of calibrating your protractor, it’ll feel like an effortless part of your carpentry process. In fact, it’ll likely become something you do without thinking twice, ensuring that every measurement is accurate and every project is executed with ease.
The more you calibrate, the more you’ll notice just how much it improves the quality of your work. No more guesswork, no more frustrating mistakes—just clean, precise cuts that come together perfectly every time. This consistency in your work will not only improve the aesthetics of your projects but will also save you valuable time and effort.
A Small Investment for Long-Term Gains
Finally, the FAQs highlight a crucial point: calibration is a small investment in the long-term success of your projects. Whether you’re a professional or a hobbyist, taking the time to calibrate your digital protractor regularly will pay off in spades. It ensures that you’re always working with a tool that’s as accurate as possible, helping you achieve the best possible results each time.
In conclusion, the FAQs underscore the importance of treating calibration as an integral part of your process, not just a one-off task. By committing to regular calibration, you’ll elevate your carpentry game, reduce errors, and build with confidence, knowing that your tool is working at its best.
So, take the knowledge from the FAQs, apply it to your future projects, and remember: precision is key to great carpentry. Whether you’re framing a house, building custom furniture, or simply making a small repair, a well-calibrated tool will help you execute your work flawlessly, ensuring your projects shine with professionalism and skill.
Happy woodworking!