Mastering the Art of Clean, Damage-Free Punching
Let’s be honest — there’s nothing more frustrating than leaving a nasty dent, scratch, or crater on a surface you worked so hard to keep perfect. You line up your automatic center punch, press down confidently, and… bam! Instead of a neat dimple, you’re staring at a scarred patch that ruins the finish. Ouch, right?
If that scene feels painfully familiar, you’re in the right place. In this guide, we’ll talk all about avoiding surface damage with automatic center punch tips — how these tiny tools can make or break your project, and what you can do to keep your surfaces looking flawless.
We’ll walk through the science of why surface damage happens, the best practices to prevent it, and the smart techniques pros use for clean, precise results. Along the way, I’ll share a few real-world tricks and friendly advice (the kind you’d get from a shop buddy who’s already made every mistake so you don’t have to).
So, grab your punch, take a breath, and let’s turn those frustrating mishaps into confident, clean marks. By the end, you’ll know exactly how to punch like a pro — no scratches, no regrets.
Understanding Automatic Center Punches
What is an automatic center punch?
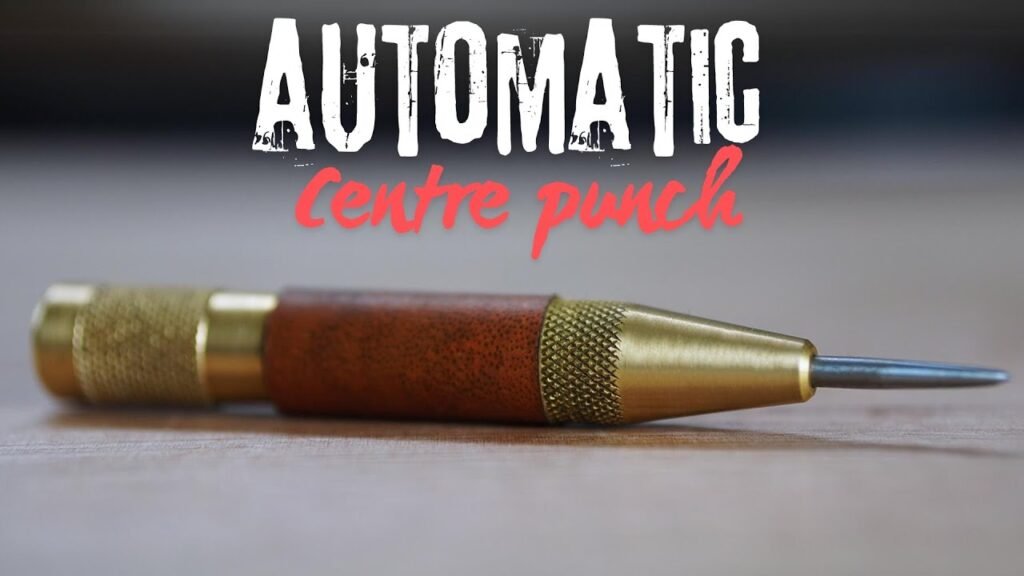
An automatic center punch is a hand tool designed to make a small dimple or indentation in a work-piece—usually metal or wood—to guide a drill bit. Unlike the traditional punch + hammer combo, it stores energy in an internal spring and releases it in a sudden impulse when you press the tool against the surface.
Its basic parts:
- The punch tip (hardened steel)
- A hammer mass (spring-loaded)
- An intermediate tumbler or rod (in some designs)
- The outer housing / body (often with an adjustment mechanism)
When you push the punch, you compress the spring; at a certain point, the mechanism releases, driving the tip into the surface and creating a dimple.
One cool thing: Because the force is repeatable (same spring travel, same release), you get consistent indentations — assuming you’ve set it up properly.
Why use one?(advantages & limitations)
Here are some advantages (and limitations) — think of this like choosing the right tool for the job:
Pros
- Speed & ease: No hammering needed. Just press, and you get a mark.
- Repeatability: You can generate consistent marks, which is handy when creating patterns or many holes.
- Reduced shock & chatter: Because the impact is internal and not from an external hammer, there’s often less risk of bouncing or slipping if used properly.
- Compact and portable: Good for fieldwork or tight spaces.
Cons / limitations
- Fixed force (or limited adjustment): Some punches don’t offer much control over impact energy; if force is too high or low, you get damage or weak marks.
- Less control for delicate surfaces: On soft or decorated surfaces, the punch might mar more easily.
- Wear & misalignment: If the internal parts get worn, the punch may misfire or drift.
- Less ideal for very heavy-duty work: For massive, thick steels or hardened surfaces, a strong hammer + solid punch might outperform it.
In short: a good automatic center punch is a great all-round tool, if you use it with care.
When an automatic punch is less ideal
Let me point out some scenarios where you might want to reconsider:
- Ultra-precise work (micron-level) — you might need optical or laser methods.
- Very fragile surfaces (glass, ultra-thin sheet) — the impulse might crack or flex.
- Surfaces with delicate coatings (paint, decorative plating) — risk of chipping.
- Workpieces without adequate backing — the force may dent the backside.
So, in those delicate cases, either switch to gentler methods or introduce extra safeguards (we’ll talk more below).
Why Surface Damage Happens — The Science Behind It
Okay, here’s where we get into the “why” — knowing this helps you prevent it in practice. I’ll keep it intuitive.
Material displacement, yielding, and plastic deformation
When you punch a dimple into a surface, you’re forcibly displacing material. The punch tip forces the atoms to shift, slide, and flow. If the stress exceeds the material’s yield strength, you get plastic (permanent) deformation. That’s what makes a mark.
If that deformation is uncontrolled — uneven, at an angle, or over a larger area — you’ll see a broader scar, raised edges, or smear. That’s surface damage.
Work hardening, microfractures, and stress concentration
Especially in metals, repeated or forced deformation can harden the metal locally. That’s called work hardening. The area around the dimple can become more brittle, more prone to cracking or microfractures. Also, sharp edges or irregularities concentrate stress, leading to tiny fractures or crazing on the surface.
So if you punch too deep or with too much force, you might crack or chip the surface. That’s especially likely near brittle coatings, very hard materials, or thin sheets.
Surface finish, coatings, and softness/hardness mismatch
If the surface is coated (paint, anodizing, plating), the coating is often softer and less ductile than the substrate. When you punch, the coating might crack, peel, or chip even though the base metal holds up. You’ll see ugly flaking around the dimple. Same thing if surface finish is very smooth — the punch may “grab” and drag rather than cleanly indent.
If your punch tip is harder than the surface and has micro imperfection (nicks, burrs), those little flaws will dig in and scratch sideways. So the tip must be pristine.
Misalignment, tilting, and uneven force distribution
This is a killer in real life. If your punch isn’t perfectly perpendicular, the force vector gets split. Some portion presses down, some sideways. That sideways component can cause scratching, sliding, or “walking” of the mark. The result: a skewed, elongated indent, or surface scratch where the tip drags across.
Also, if your support under the workpiece is uneven, the piece can flex under load, causing bending or local dimpling beyond where you intended. That “backside bowing” shows up as surface deformation.
Best Practices to Avoid Surface Damage
Okay, now we get to the goodies — what you can do to minimize or avoid damage. These are the tricks I’ve gathered, tested, and refined over time. Use them, and your surfaces will thank you.
Choosing the right punch tip geometry
- Use a clean, sharp tip. Even small nicks or burrs cause scratching.
- Standard tip angle (often ~90° or 120°): flatter tips distribute stress, sharper tips concentrate it. Choose based on your material.
- For delicate surfaces, consider a softer backup tip (e.g. brass or stellite) to reduce scratch risk on finish.
- Some punches have replaceable tips or tip adapters — so you can swap to a smoother tip for final touch work.
Also, avoid broad, flat tips on delicate surfaces. A sharper, but precise tip can reduce the contact area, concentrating force and thus needing less total energy.
Adjusting punch force / spring tension
- Use a punch with adjustable tension (some auto punches let you twist a collar to vary spring preload).
- Start with light settings. You want just enough force to make a visible dimple, not a crater.
- For tougher materials, gradually increase.
- If the punch force is too high, it’ll dig too deeply and damage surroundings. Too low = insufficient indentation, wandering drill bits.
Think of it like dialing in a camera exposure — dark (strong punch), bright (weak). Find the “just right” point.
Supporting the workpiece: backing, fixturing, and clamping
One of the best protections is good backing:
- Use a thick, hard, flat support (steel plate, bench block, hardened backing block) under your work piece. This stops the material from flexing or pushing through.
- Clamp or fixture the part to prevent movement or vibration.
- If punching near an edge, provide extra reinforcement behind or use a sacrificial plate extension.
- For sheet metal, place a bucking bar or block directly behind the punch zone to prevent distortion. (Many machinists advise backing aluminum punches this way to prevent surface warping.)
In short: don’t let your work float — brace it solidly.
Pre-marking or pilot dimpling
Before full punch:
- Use a prick punch / dot punch (sharper, lower-angle) to make a small, faint dimple or scratch at the intersection. This gives your automatic punch a “landing pad.”
- Or use a scribe, center scriber, or micro-point scriber to lay out your intersection lines.
- In some workflows, people lightly “walk” the punch toward the perfect spot, gradually focusing the dimple (tilt the punch slightly toward desired shift). This is delicate; only do it with light blows.
Doing that reduces the risk of the punch sliding off or scratching when it first contacts.
Incremental punching / “walking” the mark
This is a finesse technique:
- Start with a light punch (small mark).
- Inspect. If you’re a bit off, adjust your punch slightly (tilt, shift) and lightly punch again to nudge the dimple.
- Repeat until aligned.
- Then apply a final full-strength punch.
This method lets you correct small errors before committing, reducing chance of large surface damage or off-center marks.
Maintaining perpendicularity and stability
This is golden advice (from my own slip-ups):
- Always aim to hold the punch exactly perpendicular (90°) to the surface. Even a few degrees of tilt cause side force.
- Use your body and hand to stabilize the tool before triggering. Resting your hand or shoulder helps reduce wobble.
- Use fingers or light clamp to “anchor” the tool body before pressing.
- Keep your line of sight aligned so you visually verify perpendicular before impact.
- Avoid “wrist flicks” — sudden shifts just before impact.
A good rule: think steady pressure, then release, not slam and hope.
Cleaning, lubrication, and surface prep
- Clear the surface of dust, chips, burrs. Even particles act as scratch initiators.
- Slightly oil or use light lubricant (e.g. cutting oil, light machine oil) if safe for your surface/coating. This can reduce friction, galling, and scratching.
- Clean the tip of the punch often — wipe off metal shavings or residue.
- If the surface has coating (paint, anodize), mask around the area temporarily to catch stray burrs or chips.
- Use tape, thin film, or even paper overlay around the spot to catch micro-abrasives.
These steps reduce microscopic grit or abrasion that make tiny surface scrapes.
Checking and replacing worn tips
- Routinely inspect your punch tip under magnification (loupe, microscope) for nicks, burrs, or rounding.
- If wear appears, dress or replace the tip. Don’t keep using a damaged tip — that’s like a dull saw blade cutting your finish.
- Some high-end auto punches let you replace the striking pin or tip.
- Sometimes it’s smarter to keep a “finish punch tip” — a pristine spare you use only on final, visible surfaces.
Your best tool is only as good as its tip condition.
Material-Specific Considerations
Let’s get real: a technique that works on steel might mess up aluminum. Tailor your approach.
Soft metals (aluminum, brass)
- These are more easily deformed. The risk of marring or warping is higher.
- Use lower impact, finer tips, and strong backing.
- People often caution against center punching thin aluminum because of work hardening or causing drill wander.
- Many machinists back aluminum punches with a solid block to prevent distortion.
- On soft metals, avoid repeated punches in same spot; rotate slightly or shift if you need multiple hits.
Hard metals (steel, stainless, tool steels)
- You may need higher punch force and more robust tips.
- But the risk of cracking or tip damage is higher — inspect tip frequently.
- Use lubrication to reduce friction and heat.
- Finish with a lighter clean-up pass if the initial mark is coarse.
Thin sheets and foils
- They’re especially vulnerable to bending, buckling, or double-surface dimpling.
- Use sacrificial backing plates or a sandwich support (steel on both sides).
- Use very light impact, maybe even skip the punch and start with a sharp center drill.
- Some prefer to skip punching altogether and instead gently “kiss” with a micro drill tip first.
Coated, painted, or plated surfaces
- The coating is likely more fragile than the substrate.
- Use minimal impact, masking, and a pristine punch tip.
- Ideally, punch through the coating into the substrate, not vice versa.
- After punching, inspect coating for micro cracks; apply touch-up or sealant if necessary.
Non-metal (plastics, composites)
- These materials may not like sudden impulse — they crack, chip, or splinter.
- Use very light force or even manual punches.
- Sometimes pre-heating (slightly warming the plastic) can reduce brittleness — only if safe for that material.
- Use cushioning backing (e.g. dense foam + plate) to absorb shock.
Common Mistakes & How to Recover
Even experienced folks slip up. Let me walk you through pitfalls and how to fix them.
Excessive force / over-punching
If you use too much energy:
- The dimple becomes too deep, spreading cracks or fractures outward.
- You might distort or tear the surface edges.
- The backside may bulge or reverse mark.
Recovery:
- Stop immediately.
- Lightly polish or sand the area (if surface allows) to remove sharp ridges.
- Apply filler or touch-up finish (paint, anodize, polish) to smooth.
- For next punch, reduce force drastically and use incremental method.
Off-axis hits / cocking
If your punch tilts:
- You get a skewed, smeared indent or a scratch.
- The punch might slide, nicking adjacent surface.
Recovery:
- Use very fine abrasive or polish to even out the scratches.
- If coating chipped, retouch carefully.
- Re-align punch tool, practice perpendicular technique before reattempt.
Re-using a damaged mark
Sometimes people try to “center” within an existing rough mark. That often makes the mess worse, because the punch may follow the ridge or get trapped.
Recovery:
- Smooth or polish the flawed area.
- Create a fresh, clean dimple nearby (if tolerances allow).
- If you must use the same location, enlarge the hole slightly or use a larger drill to clean through the flawed area.
Surface scratching from tip slip
If the punch tip slides before release, it can scratch before indenting.
Recovery:
- Lightly polish or blend the scratch.
- Use masking tape or a guard around punch area in future.
- Improve tip sharpness and ensure starting alignment (scribe dimple helps).
Corrective measures in general
- Use a micro-file, sandpaper (very fine grit), or polishing compound on surface.
- Use touch-up coatings, paint, or finishes to hide small scars.
- Sometimes fill with micro-filler (e.g. epoxy, resin) then re-finish.
- If the blemish is tiny, leave it and document — accept that 100% perfection is tough in real work.
Tools, Accessories & Upgrades That Help
Let me share what’s in my toolbox (and what I’d recommend to a friend) — these tools can really upgrade your control and reduce surface damage.
Adjustable automatic punches (with variable tension)
These punches let you twist an end cap or collar to vary spring preload. On one setting you get soft dimples; on another, deeper ones. Great flexibility.
If you do a lot of punching in mixed materials (steel, aluminum, coated), this is a must-have.
Interchangeable or replaceable tips
Some high-end punches allow tip swapping. You might have a “rough tip” for heavy work and a “fine tip” for finish surfaces. The ability to remove, dress, or replace the striking pin gives longevity.
Optical center punches and micro-punches
When precision is critical, optical center punches combine a magnifier / reticle with a punch, helping you align more precisely and reduce marking. Many machinists prefer opticals when tolerances are tight.
Fixturing, clamps, and jigging
A well-designed jig with recesses for the punch avoids slippage. Clamps keep the part immobile. Use guide bearings, locating pins, or bushings to align the punch in multi-hole patterns.
Backing blocks, sacrificial plates, anvil surfaces
- Hardened steel backing plates
- Toolmaker’s blocks
- Sacrificial plates (cheap steel) you place under the workpiece
- Bench blocks or hardened anvils
These create a stable, consistent support so your punch doesn’t “break through” or distort the workpiece.
A Sample Workflow / Step-by-Step Routine
Let me walk you through how I’d do a typical surface punching job — as if you and I are side by side.
Layout and target point
- Use calipers, scribe lines or layout tools to precisely mark your hole location.
- Scribe intersecting crosshairs.
- Use a fine-point scribe or prick punch to mark the intersection lightly.
Setting up the workpiece
- Place the piece on a flat, rigid backing block (steel plate)
- Clamp securely so it can’t move
- If near edges, ensure extra backing beyond the work zone
- Clean the surface (wipe debris, chips)
- Optionally, apply a light coating of lubricant or oil (if compatible)
Pre-dimpling or scratch mark
- Use a prick punch or micro-point scriber to create a small dimple or scratch at the spot.
- Inspect for alignment, adjust if necessary.
First light punch, evaluate, adjust
- Set automatic punch to low tension setting.
- Apply the punch lightly — just enough to mark surface.
- Inspect: is the dimple centered? Any drift?
- If off, re-position slightly by tilting gently, then punch again.
- Repeat until you’re confident it’s aligned.
Final full punch
- Increase punch tension to desired level (if adjustable).
- Hold punch perpendicular, steady your hand.
- Press firmly to trigger the punch.
- Inspect the dimple, check for scratches, uneven edges, or cracking.
Post-punch inspection
- Use a magnifier or loupe to check for micro cracks, chipping, or ridges.
- If needed, lightly polish or blend edges
- If coating chipped, touch up finish.
- Document the result (take a photo, note settings) for future reference.
Rinse, repeat, and with experience, the routine becomes intuitive.
Precision Without the Scars — Your New Punching Confidence
And there we have it — the secret recipe for clean, confident punching without the dreaded surface damage! When you think about it, mastering the automatic center punch isn’t just about creating a dimple; it’s about developing the kind of precision and care that separates rushed work from craftsmanship.
Surface damage from an automatic center punch is a sneaky foe. It creeps in through nicks, tilts, overloads, weak backing, or just sloppy technique. But the good news is: almost all of it is preventable — with the right mindset, a few good practices, and respect for the surface.
Some of the key takeaways:
- Understand how impulses, material flow, and alignment interact
- Use proper backing, clamp securely, and never let your workpiece float
- Pre-mark lightly, incrementally approach the target, then commit
- Always aim for perpendicular, steady pressure, and minimal sideways force
- Maintain your punch tip in pristine condition
- Match your method to the material (soft vs hard, coated, fragile)
- Use adjustable tools and precision accessories when you can
Remember: the difference between a “good tech” and a “great artisan” is often in those little finishing touches — avoiding that one scratch or mar can elevate your work.
I hope this helped you feel more confident the next time you’re using an automatic center punch on a finished surface. If you want, I can also prepare a cheat sheet or printable checklist you can use in the shop. Do you want me to do that?
Please read more about the best automatic center punch.
FAQs
Can automatic center punches really damage delicate coatings?
Yes — coatings like paint, anodizing, or plating are often more brittle than the substrate. A strong impulse or misaligned strike can crack, chip, or peel the coating even if the underlying metal holds firm. Use minimal force, masking, and a pristine tip to reduce this risk.
How do I choose the correct punch force setting?
Start with the lowest force setting that yields a visible dimple. Then, for tougher materials, you can incrementally increase. Watch for signs of over-punching (spreading cracks, ridges). If the punch skips or fails to indent, increase. If it mars the surface, reduce.
Is it better to use a traditional punch + hammer instead of an automatic punch?
It depends. For extremely delicate surfaces or very careful control, a manual punch gives you more tactile feedback. But with skill, automatic punches are faster, more consistent, and less prone to slip — provided you use them wisely.
What should I do if my punch tip gets a nick or burr?
Stop using it immediately. Dress or polish the tip (if possible) or replace it. Using even a slightly flawed tip risks scratching or digging irregular marks. Keep a backup “finish tip” for critical surfaces.
Is punching always necessary before drilling?
Not always. On materials where the drill bit itself is sharp and starts reliably (especially small size bits), you might skip punching. But punching helps prevent wandering, ensures accuracy, and gives a starting recess. For tricky surfaces or materials, it’s safer to punch first.